Create a Custom File Manager Renderer
Learn how to create a custom renderer for the File Manager component
Overview
File Manager component can be customized using our Composition API, which allows you to replace the default renderer entirely, or apply conditional logic based on the props being passed to it. In this article, we’ll show how you can implement a custom renderer.
Replacement of the default renderer is useful if you want to integrate your own asset manager, which communicates with a different API, or a third party library/service (like Cloudinary, Dropbox, etc.), and have Webiny use your new component everywhere in the system.
This article demonstrates renderer customization to completely bypass the default File Manager GraphQL API. If you want to extend the existing renderer, or the File Manager GraphQL schema, please get in touch on our Slack Community  .
.
FileManagerRendererProps
To understand the FileManager React API, let’s look at the following props type. These are the props that are passed to the renderer, and these are the props that you should be able to handle in your custom implementation, as they’re used in various places in Webiny.
/**
 * React props for the FileManager renderer.
 */
type FileManagerRendererProps = {
  /**
   * Mime types to accept for upload, and show in the asset browser.
   */
  accept?: Array<string>;
  /**
   * Should the File Manager show only images?
   */
  images?: boolean;
  /**
   *  Maximum allowed size for a single image upload.
   */
  maxSize?: number | string;
  /**
   * A callback to run when File Manager is being closed.
   */
  onClose?: Function;
  /**
   * A callback to run on asset upload completion.
   */
  onUploadCompletion?: (files: FileManagerFileItem[]) => void;
  /**
   * Display only assets owned by the current identity.
   */
  own?: boolean;
  /**
   * Scope allows us to only browse assets related to the context we're in.
   *
   * For example, we use a scope of `apw`, to only show files related to the APW (Advanced Publishing Workflow) app.
   * This still allows you to use other tags, but they will be applied on top of the scope tag.
   */
  scope?: string;
  /**
   * Show assets tagged with the specified tags.
   */
  tags?: Array<string>;
} & (
  | {
      /**
       * When `multiple` is not set, a user can only select 1 file.
       * This is the DEFAULT behavior.
       */
      multiple?: never;
      /**
       * A callback to execute when an asset is selected.
       */
      onChange?: (value: FileManagerFileItem) => void;
    }
  | {
      /**
       * Allow selection of multiple files.
       * This means that the `onChange` callback should always receive an array of files.
       */
      multiple: true;
      /**
       * Maximum number of files a user can upload at once.
       */
      multipleMaxCount?: number;
      /**
       * Maximum total size of all files that a user can upload at once.
       */
      multipleMaxSize?: number | string;
      /**
       * A callback to execute when files are selected.
       */
      onChange?: (value: FileManagerFileItem[]) => void;
    }
);

/**
 * Represents a file object managed by the File Manager.
 * File item is designed to require the minimum information necessary for all the Webiny apps to operate.
 * In 99% of cases, you only need a file `src`. For any other data, we use the `meta` array of objects.
 */
export interface FileManagerFileItem {
  id: string;
  src: string;
  meta?: Array<FileManagerFileItemMetaItem>;
}

/**
 * With this we allow developers to add any value to file's meta via component composition, thus the `value: any`.
 */
export interface FileManagerFileItemMetaItem {
  key: string;
  value: any;
}
Replacing the Default Renderer
The following source code demonstrates everything you need to create and register a component plugin for the File Manager renderer.
The article assumes that you’re using the default Webiny setup, thus the usage of Cognito in the code example.
import React from "react";
import { Admin, createComponentPlugin } from "@webiny/app-serverless-cms";
import { FileManagerRenderer, FileManagerFileItem, OverlayLayout } from "@webiny/app-admin";
import { Cognito } from "@webiny/app-admin-users-cognito";
import "./App.scss";

/**
 * Create a plugin for the composable component `FileManagerRenderer`.
 */
const CustomFileManager = createComponentPlugin(FileManagerRenderer, () => {
  return function FileManagerRenderer(props) {
    /**
     * We'll use a Lorem Picsum (https://picsum.photos/) for this example.
     */
    const setRandomImage = () => {
      /**
       * Generate a unique ID.
       */
      const id = Date.now().toString();

      /**
       * Construct a standard FileManagerFileItem object.
       */
      const image: FileManagerFileItem = {
        id,
        src: `https://picsum.photos/seed/${id}/200/300`,
        meta: [{ key: "source", value: "https://picsum.photos/" }]
      };

      /**
       * If the components was configured to handle multiple files, return an array.
       * Otherwise, return a single file.
       */
      if (props.multiple) {
        props.onChange && props.onChange([image]);
      } else {
        props.onChange && props.onChange(image);
      }

      /**
       * At this point, we want to close the File Manager, so we need to call the `onClose` callback.
       */
      props.onClose && props.onClose();
    };

    /**
     * For this example, we use the `OverlayLayout` component, which renders a full screen overlay,
     * just like we have in our default renderer. You could render a modal dialog, or any kind of popup dialog according to your needs.
     */
    return (
      <OverlayLayout onExited={() => props.onClose && props.onClose()}>
        {/* Render a simple button, and assign a random image on click. */}
        <button onClick={setRandomImage}>Set random image</button>
      </OverlayLayout>
    );
  };
});

export const App: React.FC = () => {
  return (
    <Admin>
      <Cognito />
      {/* Mount the plugin, which will register a HOC for the `FileManagerRenderer`. */}
      <CustomFileManager />
    </Admin>
  );
};
And that’s it! With this, we’ve created the most basic custom File Manager renderer which will now be rendered everywhere in the system. Here’s a little preview of what it looks like in the Webiny Admin app.
And if we inspect the form state, we’ll find our image data exactly as we specified in our custom renderer:
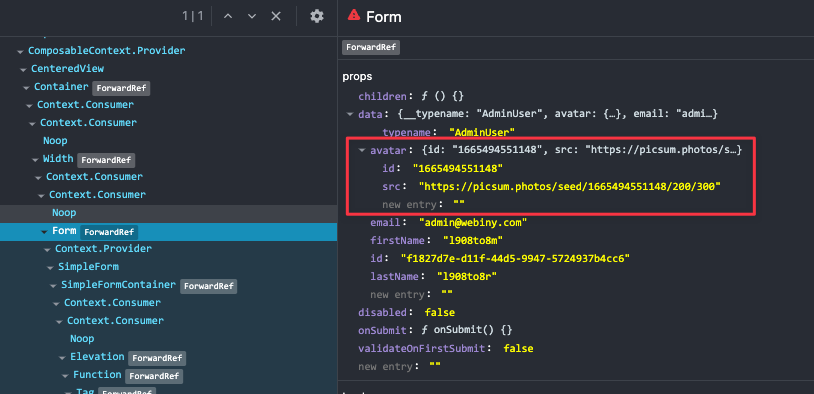 Image from the custom renderer
Notice how we don’t have our meta array present in the state. That’s because the view in the video uses a <SingleImageUpload/> component which, by default, ignores the meta returned from the File Manager.
If this was a simple FileManager component, form state would look like this:
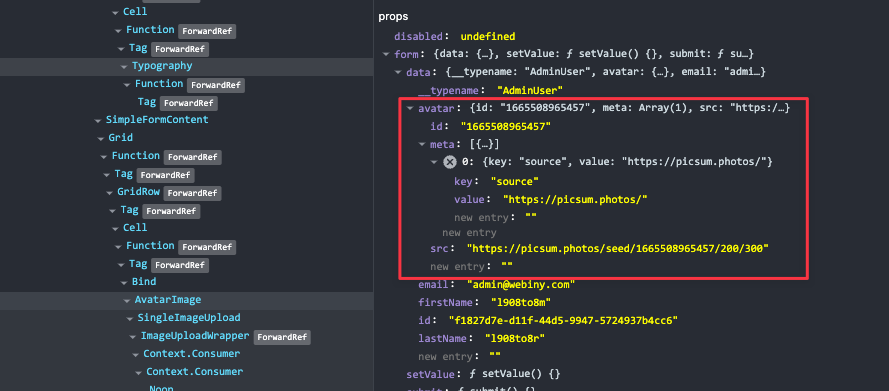 Image from the custom renderer with meta
Conclusion
We’ve covered how to override the default File Manager renderer and implement your custom logic of handling files. From here, you can continue upgrading this basic example and connect your React component to an external API or an asset management service. The only thing you need to follow is the component interface defined by the FileManagerRendererProps type.