Introduction
How theming works inside Webiny Page Builder.
Please hold on while we update this article with the latest information. Until then, you can take a closer look at the new theme object, located in the apps/theme/theme.ts 
- what does the Page Builder theme consist of
- what plugins are used in Page Builder theme
Configuration File
The main configuration file for the Page Builder theme is located at: apps/theme/pageBuilder/index.ts 

The configuration file is structured in several sections like so:
[
  // Main theme plugin containing the theme definition.
  {
    name: "pb-theme-default", // Name of your theme.
    type: `pb-theme`, // Plugin type.
    theme: {} // Theme definition.
  } as PbThemePlugin,

  // Register a layout ... you can register multiple layouts inside a single theme.
  {
    name: "pb-page-layout-static", // Name of the page layout.
    type: "pb-page-layout", // Plugin type.
    layout: {} // Layout definition.
  } as PbPageLayoutPlugin
];
As you can see from the example above, we export two plugins that make the default Page Builder theme. Let’s discuss them in detail in the next section.
Page Builder Theme Plugins
pb-theme Plugin
This is the plugin that registers the actual theme, together with several other elements. It contains the following elements:
{
        name: "pb-theme-default",
        type: "pb-theme",
        theme: {
            colors: {
                primary: "var(--webiny-theme-color-primary)",
                secondary: "var(--webiny-theme-color-secondary)",
                // (...)
            },
            elements: {
                button: {
                    types: [
                        { className: "", label: "Default" },
                        { className: "primary", label: "Primary" },
                        // (...)
                    ]
                }
            }
        }
    }
Learn more about the specific theme components:
pb-page-layout Plugin
The layout plugin is used to register layouts. Layouts are used to render the page content. The most commonly used layout includes a header at the top, page content in the center and a footer at the very bottom.
In the Page Builder, you can have multiple layouts. For example, one layout where the page is rendered in two-columned, the other in three columned layout.
Here is an example of how to register a layout:
import StaticLayout from "./layouts/Static";

(...)

{
    name: "pb-page-layout-static",
    type: "pb-page-layout",
    layout: {
        name: "static",
        title: "Static page",
        component: StaticLayout
    }
} as PbPageLayoutPlugin
Each layout has the following attributes:
name- an internal identifier for that particular layouttype- plugin type, must be set topb-page-layoutlayout- an object containing the layoutname,title, and a Reactcomponentused to render the layout
To introduce multiple layouts all you need to do is register multiple pb-page-layout plugins.
It’s also quite easy to register a new layout into the default theme:
// Some code is removed for the sake of brevity.
import { plugins } from "@webiny/plugins";
import CustomLayout from "../custom-layout";

plugins.register([
  // (...)
  {
    name: "pb-page-layout-my-custom-layout",
    type: "pb-page-layout",
    layout: {
      name: "my-custom-layout",
      title: "My layout",
      component: CustomLayout
    }
  }
  // (...)
]);
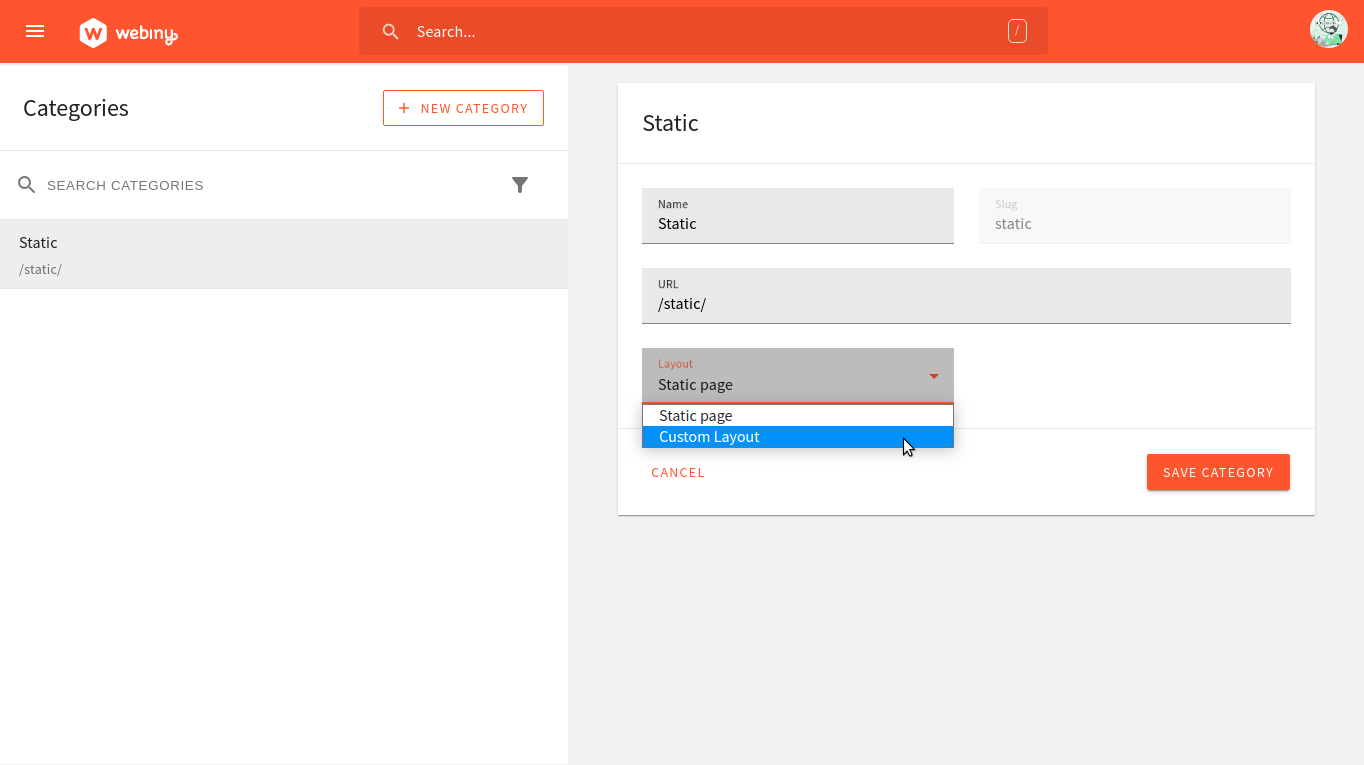
After saving the change, your newly registered layout should appear in the Categories form, in the Page Builder application as shown below:
 New custom layout
In the Page Builder, layouts are linked to page categories. When you create a page category, say “Blog”, you need to select a layout. Each page created inside the “Blog” category, by default, use that layout. However, inside the page settings, you can overwrite that on a per-page basis if you need to.